
Who doesn’t love well-crafted animations? Great animated films or series are unanimously loved, and like all creative productions, they require a lot of time and effort. The animation pipeline also has many nuances, so the final product can astound us with everything from a great story to a delightful ambiance to how that character moves in that scene.
Each of us at Picotion has been down that creative rabbit hole at least several times, so we know what exactly goes into each level of making an animated film or series. There are three main stages in the animation pipeline:
- Pre-production: Here’s where the first brainstorms happen, a script is written, environments are created, and a final pitch is prepared.
- Production: Most of the technical heavy lifting happens here, like modeling, texturing, and rendering.
- Post-production: Here, the visuals are finalized, non-visual elements (like music) are added, and the product is shipped and marketed.
This article outlines pre-production, the first of the three stages and the backbone of every great animated creation. This is where you brainstorm for the main ideas, look for stories to tell, create your characters, design your environments, develop a storyboard, make a story reel, and put it all together in a pitch for producers.
Before we dive in, it’s important to note that pre-production will probably be the longest stage of your production. (For example, it’s pretty common to return to each stage even after it’s finished and make adjustments.) With that said, let’s take a look at every major step in pre-production!
1. Concept Development
Everything starts with an idea, and pre-production is no exception. In fact, idea generation and evaluation are the first step in a broader process we call “concept development.” The entire step goes like this:
- Playing with ideas,
- Drafting a story,
- Basic character development,
- Basic setting development, and
- Making a mini-pitch for your own people.
So, by the end of a concept development cycle, you’ll have a rough draft of the story, the characters, and the environments. Then, the team responsible for these items will create a mini-pitch for internal use. If everyone in the animation studio like the mini-pitch, the team will go on to turn the story into a script.
People Involved
- Creative director
- Writers
- Concept artists
Pro Tips
- Brainstorm individually, together, and then brainstorm some more! Here are some quick brainstorming tips from MIT that we agree with.
- Don’t stop until you have a unique, valuable concept. Everything else depends on it!
- Stick to basic narrative structures when you’re writing the story. Maybe even go for the traditional opening, inciting incident, climax, and resolution framework.
- Don’t worry about details in the story or the characters. The bones of the animation are enough to make an initial pitch.

2. Scriptwriting
The difference between a story and a script basically comes down to the details. A story is a sequence of events in any medium (like in a book, a movie, or a phone call), and it doesn’t necessarily account for every single line of dialogue and the settings in which they happen.
On the other hand, a script is a story written specifically for a film, a play, a video game, etc. It covers details of everywhere the camera goes and everyone’s lines of dialogue. Generally, scripts go scene by scene featuring setting descriptions, detailed dialogues, and essential actions. So, collaborate with your scriptwriters until you have a final script everyone’s happy with!
People Involved
- Scriptwriters (writing the final script)
- Writers (providing insight into the original texts and rewriting if needed)
- Concept artists (providing insight if need)
- Creative director (overseeing the work and providing feedback)
Pro Tips
- We only have general advice here. (Know your audience, show and not tell, etc.) So, hire professional scriptwriters and they’d already know everything we know!
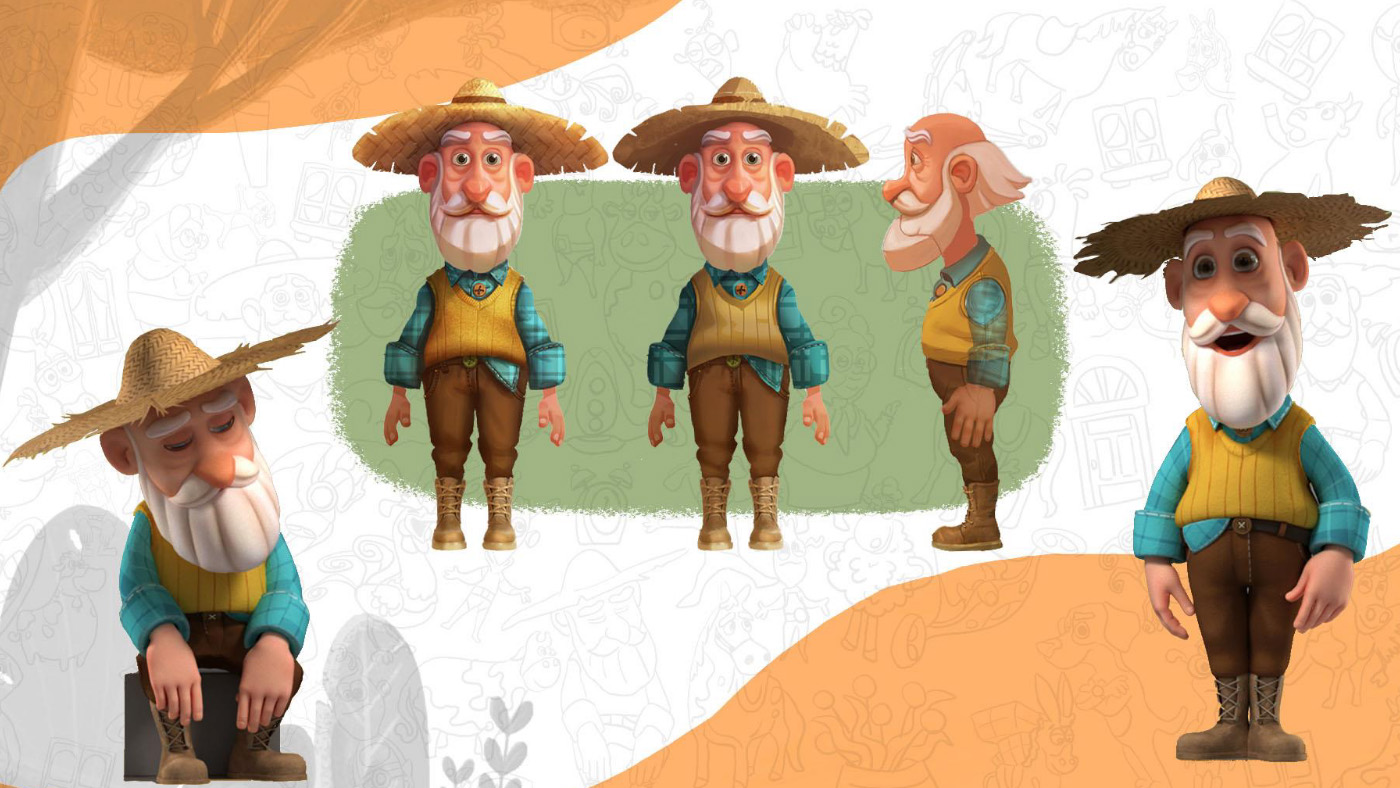
3. Character Design & Development
At this stage, you have a (hopefully) great script. Two items could drive a script: dialogues or actions. Most scripts have both, but some only have one or the other. What all scripts have, however, are characters. So, it makes sense for character design and development to come right after the scriptwriting stage.
Here’s where you get specific about the characters. What backgrounds do they come from? What exactly do they look like? How do they talk? How do they dress? How do they react to stress or good news? What are their deepest held beliefs? What are their fears? Everything!
In the words of Robert McKee, the author of “Story: Substance, Structure, Style, and the Principles of Screenwriting” which could be every writer’s bible:
“Not a sparrow should fall in the world of a writer that he wouldn’t know. By the time you finish your last draft, you must possess a commanding knowledge of your setting in such depth and detail that no one could raise a question about your world—from the eating habits of your characters to the weather in September—that you couldn’t answer instantly.”
So, on that note, let’s go to Environment Design after the “People Involved” and “Pro Tips” for this section.
People Involved
- Character artists
- Concept artists (providing insight into the original concepts)
- Creative director (overseeing the work and providing feedback)
Pro Tips
- While you can always come back and refine your work, it’s best to stick to the sequence of stages in pre-production. For example, you don’t want to end up with a lot of unused characters just because the story wasn’t finalized.
- Consider every character’s role in the story before you begin designing. It’ll help you economize time and resources.
- Be as detailed as possible. We can’t stress this one enough!
- You might also want to take a look at our guide to character design & development!
How to Create an Original Character: 3 Core Concepts
4. Environment Design
To go back to Robert McKee’s assertion above, you should have a commanding knowledge of the world and the environments, among other concepts. Think of every place your camera goes to throughout the story. At the end of this stage, your designs should detail the constants and variables of these places.
These factors determine your environments’ lighting, colors, textures, and moods. For each scene, these items include:
- Any fixtures like buildings, settlements, roads, landmarks, and natural habitats like jungles or mountains.
- Flora, fauna, soil, water, etc.
- The weather conditions and the climate.
- The time of the day.
If you’re looking for inspiration or a model to follow, you can always go to the works of J. R. R. Tolkien. His works are so finely detailed in terms of the environment that Karen Wynn Fonstad, an American cartographer, could write an entire atlas on Middle-earth, where The Hobbit and The Lord of the Rings take place. Check out The Atlas of Middle-earth, featuring complete maps and accurate accounts of the events in each environment.

5. Storyboarding
Now, this is where it really starts to feel like an animation! Before anything else, let’s review some basic definitions of shots (or scenes), panels, and sequences in filmmaking or animation.
- A shot (or scene) is any single take by a camera showing a specific action or line of dialogue. Shots usually take 3 to 10 seconds, but they can be shorter (especially in action or adventure genres) or even longer depending on what the production calls for.
- Panels are like clarifications for a shot in the storyboard. Each shot can have multiple panels showing other glimpses of what exactly happens within the shot.
- A sequence is a composition of shots or scenes that moves the story forward. A sequence can have several actions or lines of dialogue, usually in a single location.
So, what’s a storyboard? It’s like a minimalistic comic book for an entire cinematic or serial production, featuring the essential story shot by shot. Its primary function is to visualize the story, shots, and sequences before you start animating.
In other words, a storyboard is pages upon pages of the image below. The captions you see give animators specifics about each shot and they could describe these elements:
- Camera angle & motion
- Character positions
- Action & movement
- Character dialogues
- Background details
- Significant objects
- Special effects
- Lighting and mood
- Timing and pacing
- Notes for animators
Also, note that storyboarding is the stage where you decide on a color palette. The storyboard itself doesn’t need colors (many storyboards don’t, as that requires extra effort), but here’s where the colors are determined.
People Involved
- Storyboard artists
- Lead character artist (ensuring the storyboard is consistent with character profiles)
- Creative director
Pro Tips
- Include only the essential shots and key poses in those shots.
- Avoid details in the artwork. Your focus should be on the story.
- Keep the captions extremely concise and clear.
- If you’re making an animated series and this is your first pre-production, make only one episode into a storyboard at this stage.
- Use storyboarding software to streamline the process further.
- Don’t lose sight of the big picture!

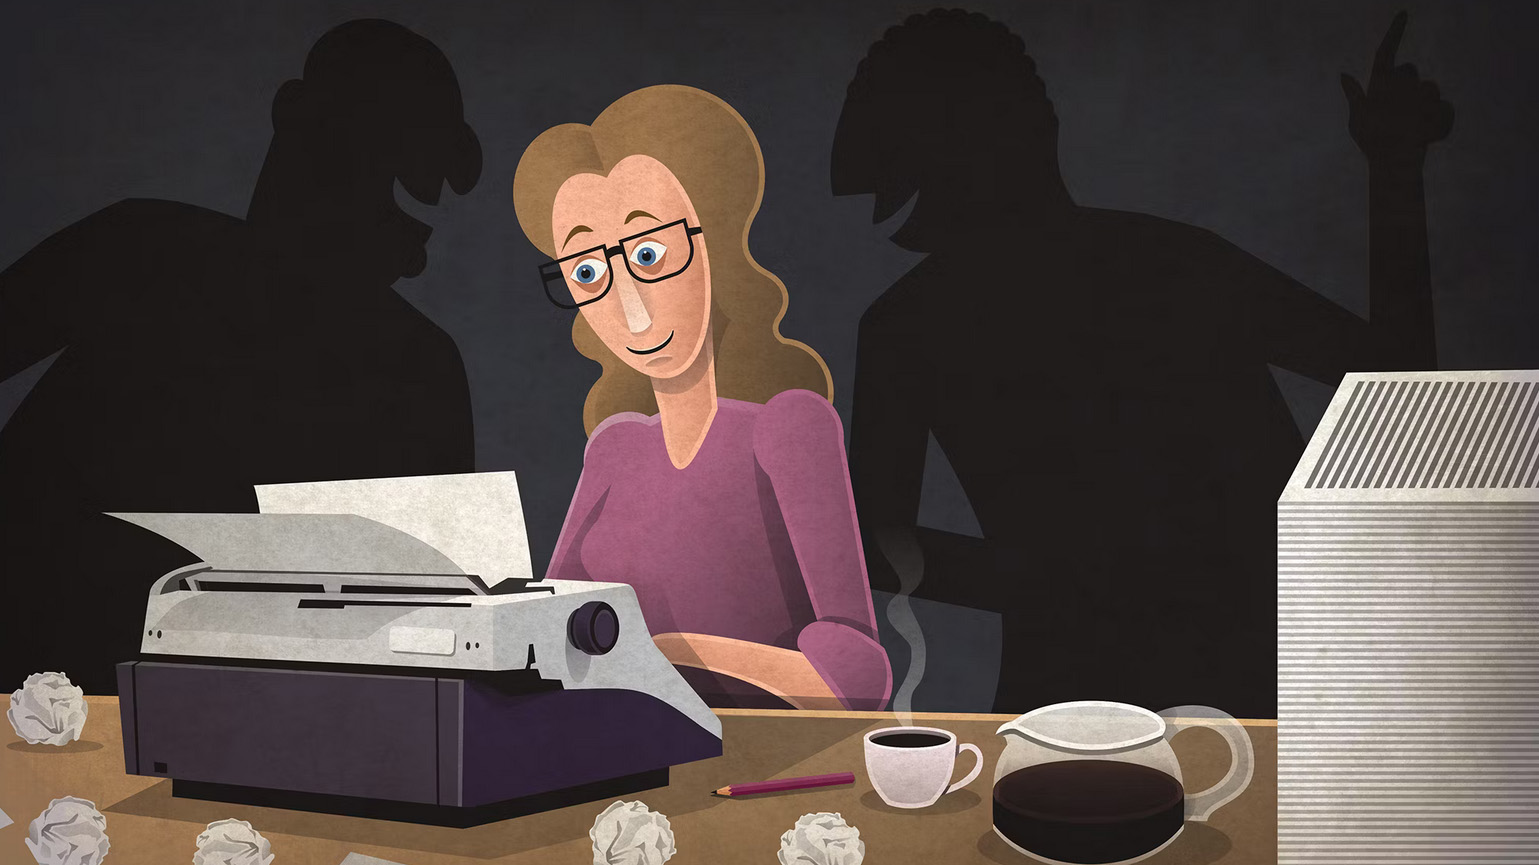
6. Creating an Animatic or Story Reel
Now that you have a storyboard to guide us, it’s time to create a very real glimpse into your final product. If the storyboard was a rough, minimalistic, static draft, an animatic or story reel is the exact opposite.
A story reel is basically an animated storyboard with extra details. It runs like the final animation, except that it usually doesn’t have the final colors, voiceovers, music, or smooth transitions. Still, you’ll know here if your final animation is going to make it.
Story reels are always fun, so feel free to show them to close friends or a select audience to hear what they think. (Those are called “private screenings,” and they happen a lot!)
You can also combine the storyboard and the reel to make a full-fledged comic book. If you decide to start your animation later in the story’s world, the reel comic could provide an origin story or a fun extra for your fans or first buyers!
Stay with us! You will soon take this same story reel and pitch your animation to producers.
People Involved
- Storyboard artist (creating more material for every shot to be animated)
- Editor (putting together the scenes)
- Creative director
Pro Tips
- Use sample music or sound effects to make your reel more impressive. Don’t forget to stay true to the final product’s mood. (We’re assuming that you’re not an animation giant. If you are, go all out!)
- Use placeholder backgrounds and objects. You don’t have to have everything figured out at this stage, so use placeholders as long as they are in keeping with the final product’s look and feel.
- If you feel like the audience might be lost, you can add auditory narration to the reel.
- Get feedback from noncreators. These people are closer to your final audience.
- Iterate! Storyboarding and creating a story reel are both iterative processes, so don’t be afraid (or frustrated) to go back and adjust until you have exactly what you like.
We didn’t find a simpler story reel that wasn’t protected by NDAs or copyright, so we settled for the next best thing!
7. Putting Together a Pitch Bible
So far, the story reel is the closest we’ve come to the final animation. So, you should take it to producers if you receive positive feedback during those private screenings we mentioned. This is where they decide to go for it or not.
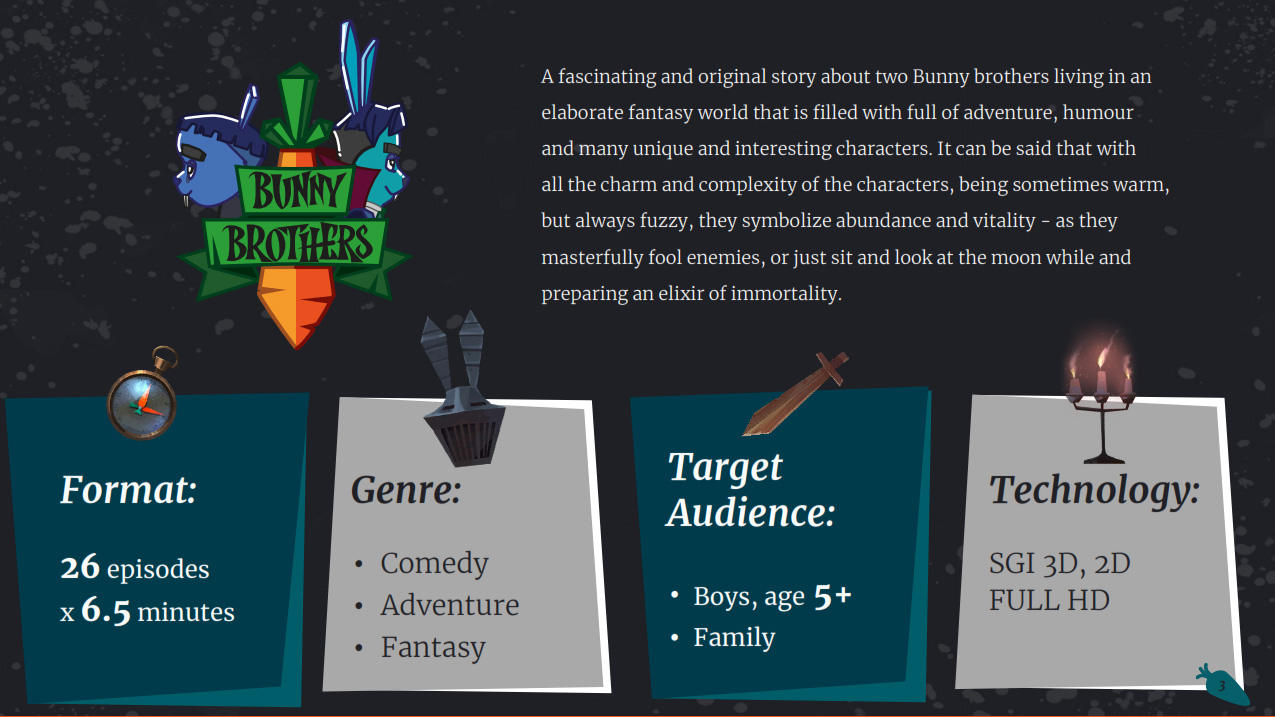
But although the reel itself is enjoyable enough, it’s not a complete pitch. You need a pitch bible and a clear project scope to secure a producer. Let’s start with the first one! As the name suggests, a pitch bible is a comprehensive document with everything you need for a pitch. It includes:
- Concept Overview: The generalities of the project, like the concept, themes, genre, etc.
- One-line pitch: A line or two that explains your entire project, preferably in one sentence. For example, “that time in your life when your friends are your family” for Friends (1994-2004), according to Marta Kauffman.
- The World: Details about the world, the environments, and the project’s time period(s).
- Character Profiles: Details about each character, from their backgrounds to their moods and role in the story.
- Story Arcs & Summary: An outline of the story, mainly covering major incidents or resolutions.
- Concept Art & Visuals: Sample character designs, storyboards, environment designs, etc., to demonstrate the project’s final look and feel.
- Target Audience: Information about your potential viewers, down to nationality, ethnicity, and age.
- Project Guidelines: General instructions on the project’s tone, artistic style, pacing, etc.
- Production Details: Details about the production cycle, possible partners and venues, budget, etc.
- Marketing & Branding: Possible marketing channels, merchandise, release dates, etc.
We do use a pitch bible for pitching, but don’t let the name deceive you! After the pitch, you should use this document as a guideline for all future investors and collaborators. So, it’s best to keep it updated as the project evolves.
People Involved
- The core creative team (i.e., everyone up to here!)
Pro Tips
- If you’re producing an animated series, you don’t need to have all episodes figured out for a pitch. You need enough to get reviews and feedback.
- Be sure to include many style frames in the bible. Style frames are visual representations of the final product and are great for pitching.
- Include a personal note from yourselves (the creators) in the pitch, stating your vision and passion for the project.
- Don’t forget an NDA when pitching!
- It’s okay if you’re unclear about the budget or scope. The producers play a role in that, and you will collaborate with them in the next step.
8. Finalizing the Project Scope
Now that you have a pitch bible and some producers intrigued, let’s finalize the project scope. You do have an idea of everything it takes to create that final work, but you should sit down with possible producers now to get crystal clear on the items below.
- Your objectives: Why are you creating this movie or series? What’s the value of your product?
- Distribution platform & market: For whom are you creating this product, and in which countries or communities? What platforms are you planning to go on?
- Animation technique & complexity: What animation style are you going for? How detailed would you like to be?
- Content length: How long is each episode or the final movie?
- Team size & expertise: How many people do you need? What level of expertise should they have?
- Level of detail: How intricate are your plotlines, environments, etc.?
- Sounds & music: How many pieces are you licensing, and how many are you creating? Do you have any particular composer in mind?
- Deadlines & schedule: When would the product be released? How about trailers?
- Budget & resources: All things considered, how much funding do you need? Do you require special equipment?
If you took the time to write down the decisions and projections about every one of these items, you have clearly defined your project’s scope!
People Involved
- The core project team
- The producers
Pro Tips
- Your objectives are ever-present in your production pipeline and help guide future decisions. Please don’t skimp on them!
- Feasibility is just as important as creativity. You can revise any decision if something isn’t feasible, but that also hampers your efficiency.
- Take time to divide the project into clear phases and processes to help streamline production.
- Many of the decisions you reach here should be documented in the pitch bible!
Final Word on Pre-production
Well, that was long! Many pre-productions are because that’s essentially the stage that makes or breaks the project. For example, Avatar (2009) spent about nine years in pre-production. It might not feel like an animation, but pre-production is the bulk of the work.
Contact us with any questions, and stay tuned for production and post-production outlines!
Also Read : Animation Outsourcing: Your Concerns, Our Answers
Author